What is the Installation Process for Starlink?
We suggest you do some research to ensure that the Starlink service is available at your location and that it is the right service for your needs. This should include the Starlink service/dish you require, expected download speeds and costs to purchase as well as ongoing fees.
Prior to placing your order, we recommend getting in touch with a professional installer to work alongside you with the project. This may well avoid any installation problems and is likely to save you some money in the long run. Your local Jim’s Antennas technician is trained and qualified and there to offer all the right advice to ensure your Starlink system operates at its optimum level.
Importantly, one of the first things to do is conduct an Obstruction Test to ensure you can receive adequate signal. You can download and use the Starlink app or contact your Jim’s technician who will conduct the test for you. In Australia, for Starlink installations specifically, an unobstructed almost 360 degree view of the sky is needed for the best coverage, pointing towards the South.
Tree canopies and other obstructions will affect where Starlink can be installed. This will become less of a concern as more satellites are launched, offering more coverage. This factor would increase the job complexity and increase the time needed to complete the job, affecting the cost.
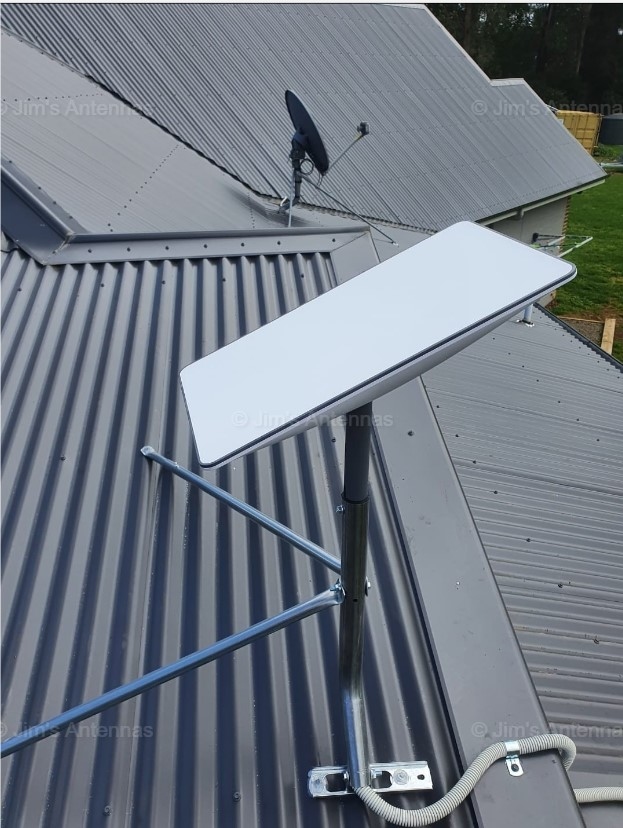
Once an appropriate location has been identified, select the most appropriate mounting hardware required so that the dish can be properly installed. When installing, take into consideration your roof and building construction and how you will run the cabling from the dish to the Starlink router including any conduit protection required and how the cable will enter the house.
Connect cable to your router and set up your new Starlink WiFi network with a new login. Connect all your devices to the new network and enjoy your new Starlink service. You may find you’ll have additional requirements to ensure good quality WiFi throughout your property, your Jim’s Antennas technician can assist you with that.
Here are the key steps reviewed:
- Site survey/assessment: A Jim’s Antennas technician will come to your home or business to provide an onsite, no obligation quote. When assessing your location our experienced technicians will carry out an obstruction test which determines the mounting location and height to receive the best possible signal. Other things they will consider are; safely accessing your roof, mounting options, possible cable routes and the location of your Router, including options to ensure adequate WiFi.
- Installation: We securely mount the Starlink satellite dish to the roof of the property (or other suitable location) and run cabling that connects the Starlink satellite dish to the router. We will create an interior outlet (if required) near where the new router is located. Our technicians will then help you set up your new internet connection and WiFi network, using the Starlink app. Any additional WiFi products you’ve requested can be installed at the same time.
- Assessment of efficiency: Once complete, your Jim’s Antennas technician will run an internet speed test to check the download and upload speed, and to ensure that your new internet connection is fast and reliable.
Next Question: How Reliable is Starlink and How Does It Compare to NBN?